In this webinar Saverio will show you how to use HoRNet plugins to correctly set that gain of your tracks

Welcome to our in-depth webinar on proper gain staging in a mixing session, using three essential tools from HoRNet Plugins: the HoRNet VU Meter MK4, HoRNet LU Meter MK2, and HoRNet TheNormalizer. This session is designed to give you a deeper understanding of gain structure, and how these plugins can streamline your workflow, improve your mix clarity, and prevent issues caused by improper level management.
Proper gain staging is one of the most fundamental aspects of audio production. It refers to the process of setting optimal levels at every stage of your signal chain to avoid unwanted distortion, maintain headroom, and ensure that plugins operate within their ideal range. Despite its importance, gain staging is often overlooked by beginners—and even by some experienced engineers—leading to a muddy, unbalanced, or overly compressed final mix. That’s why we’re dedicating this session entirely to it.
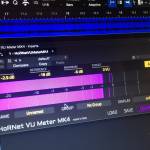
Let’s begin with the first plugin: the HoRNet VU Meter MK4. This tool replicates the classic VU (Volume Unit) meters used in analog studios. Unlike digital peak meters, VU meters measure average signal level, giving a better representation of how the human ear perceives loudness. The VU Meter MK4 is particularly useful for establishing your initial track levels. By aiming for a consistent average level across your tracks—typically around 0 VU = -18 dBFS—you ensure a solid baseline from which all further processing can be applied. This also helps your compressors, EQs, and saturation plugins behave more predictably, just as they would in an analog chain.
The VU Meter MK4 offers some great features: selectable reference levels, a trim control to adjust input level, and a peak meter overlay so you can monitor both average and peak levels at the same time. It also includes a calibration tool so you can align all your tracks easily. This is particularly useful in large projects where maintaining consistent gain levels can quickly become complex.
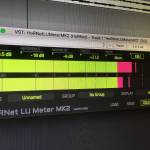
Once your tracks are trimmed and averaged with the VU Meter, the next step is checking loudness over time using the HoRNet LU Meter MK2. This plugin measures LUFS (Loudness Units Full Scale), which is the standard used in modern broadcasting, streaming, and post-production workflows. LUFS is essential if you’re preparing your music for platforms like Spotify, YouTube, or Apple Music, which normalize playback volumes. Mixing with LUFS in mind allows you to avoid loudness penalties and maintain dynamics.
The LU Meter MK2 provides short-term, momentary, and integrated LUFS readings, giving you real-time and cumulative data about your mix’s loudness. You’ll also find features like true peak metering, mid/side monitoring, and reference level targets. These are all critical for ensuring that your final mix meets industry loudness standards, while still sounding musical and dynamic.
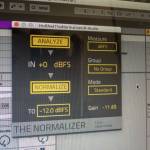
Now, once you’ve monitored and analyzed your tracks using the VU and LU meters, it’s time to automate and correct levels where necessary. This is where HoRNet TheNormalizer comes in. This plugin is a gain automation utility designed to automatically adjust the level of each track to a specified target. You can set your reference (VU or RMS, for instance), and the plugin will calculate the necessary gain to hit that target. This saves hours of manual gain staging and is extremely helpful when dealing with inconsistent recordings or large projects.
TheNormalizer can process mono, stereo, or even multichannel tracks and offers features like pre-fader normalization, post-fader adjustment, and oversampling. With just a few clicks, you can align all your tracks to the same loudness reference—no need to do it by ear or eye. It’s also perfect for situations where you receive stems or multitracks from clients that come in at wildly different levels.
In a real-world mixing scenario, here’s how you could integrate all three plugins in your workflow:
Start by loading VU Meter MK4 on every channel and adjusting your gain so each track averages around -18 dBFS (or another reference of your choice). This gives you headroom and sets a consistent dynamic base.
Use LU Meter MK2 on your master bus to monitor the overall loudness of your mix. Aim for an integrated LUFS around -14 to -16, depending on your distribution format.
If you find any tracks too loud or too soft, insert TheNormalizer and automatically match them to your desired reference level. This helps you create a clean, balanced session with no clipping and no buried tracks.
This gain staging strategy ensures that every plugin in your chain performs optimally. Compressors will trigger more musically, EQs won’t have to overcompensate for bad levels, and your mix will translate better across different speakers and systems.
Remember: poor gain staging can lead to issues like digital clipping, overcompression, and masking. But with a consistent level structure, your mix will sound clearer, punchier, and more professional—before you even start applying creative effects or final mastering.
To conclude, the combination of HoRNet VU Meter MK4, LU Meter MK2, and TheNormalizer offers a complete toolkit for managing your levels from the first fader move to the final export. These tools are lightweight, precise, and designed to integrate seamlessly into any workflow. Whether you’re a beginner looking to improve your mixes or a seasoned professional aiming to speed up your sessions, proper gain staging with these plugins is a game changer.
Thank you for joining our webinar. We hope this session has clarified how correct gain staging can transform your mixing process. Stay tuned for more HoRNet tutorials and plugin showcases designed to make your music sound the best it can be.
Loudness meter with grouping and auto gain
Digital VU meter with automatic gain
Automatic gain staging and volume levelling
